
- Western Turf Farms
DIY Lawn Installation: Steps and Common Mistakes to Avoid
For many people, DIY projects are a great way to enhance their homes while saving some money. Installing your own lawn can transform your outdoor space, leaving you with a lush, green haven, while also providing a rewarding experience.
A beautiful new lawn can not only dramatically improve the aesthetic appeal of your home, but also add value to your property should you decide to sell. Of course, the real joy comes from having a space for relaxation and recreation, where kids can run and play barefoot, or the family dog can lay in the shade of a favourite tree.
If you’re planning to install a new lawn, this article will explore some of the things you need to keep in mind and common mistakes you will want to avoid.
What to Consider Before DIY Lawn Installation
One of the primary motivations behind DIY lawn installation is a desire to save money but it’s important to weigh the pros and cons of doing it yourself versus hiring a professional. The size of the area, the type of grass, and your overall landscaping goals should all factor into your final decision. Installing the lawn yourself may result in cost savings, but the process is labour-intensive and there is the potential for mistakes especially if you are doing it for the first time. While hiring a professional may cost more, it also saves time and effort.
You will need to determine your comfort level based on the size of the job, any time constraints, and whether the savings are enough of a motivation to tackle the job yourself.
Installation Tools
As with any job, the level of success will depend largely on using the right tools. Some of the tools that are commonly required for installation include:
· Sod Cutter. This tool is used to remove grass and a thin layer of soil underneath, which may prove useful if you are replacing an existing lawn.
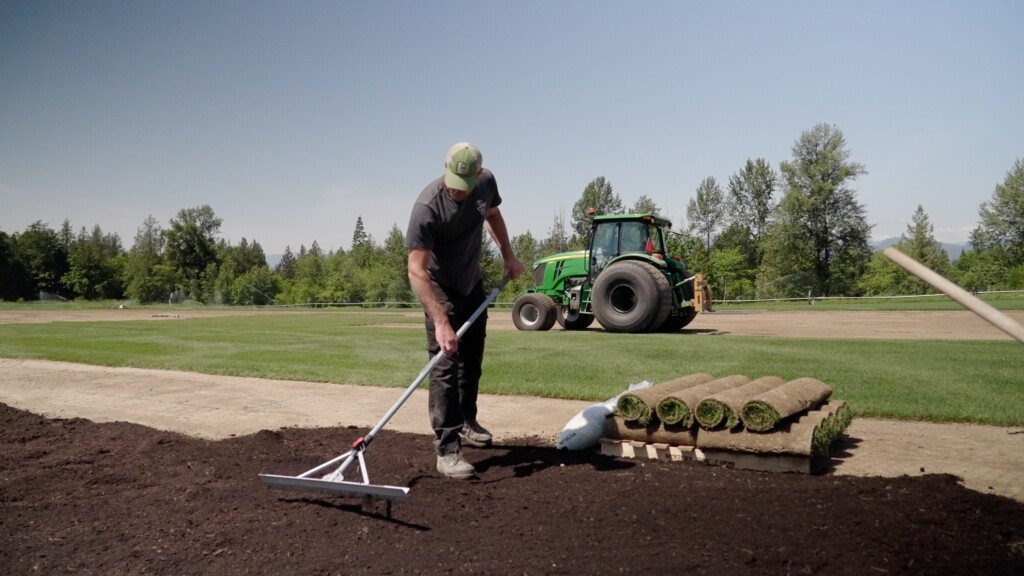
· Rake. A lawn rake differs from a leaf rake, with shorter tines that are parallel to each other.
· Lawn Roller. Resembling a small steamroller, a lawn roller is used to level the soil to create a smooth surface.
· Irrigation System. Your new lawn will require significant watering to establish. Some may choose to install a new irrigation system.
· Sharp Knife. A box cutter or sharp knife may be useful for precise sod cutting to help you lay sod around other landscaping features.
The exact cost of these tools will vary, but you will likely be able to find rental options to limit your expenses. Calculating the cost of buying vs renting tools may factor into your overall decision of whether or not to pursue lawn installation as a DIY project.
Lawn Selection
One of the major decisions to make involves choosing the right type of sod, as different varieties are better suited to specific climates, soil types, and your preference for the level of maintenance. Some choices include:
· Tall Fescue Sod is drought-resistant and has a strong root system that, combined with a higher cut (4-5 cm) provides good defence against the Chafer Beetle.
· Supreme Sod. A mix of Fescue and Perennial Ryegrass, Supreme Sod is an attractive and durable option suitable for all growing areas.
· TWCA-certified Drought Tolerant Sod. This is a mix of Perennial Ryegrass, Chewing Fescue, and Kentucky Bluegrass, specifically created for Western Turf Farms.
· Enviro Organic Sod. A variety of sod with low water needs, Enviro Organic Sod performs well in all areas and is a popular choice for environmentally conscious homeowners.
· Bentgrass Sod. This fine-textured sod is ideal for a golf-course-like appearance.
How to Install Sod
There are several steps to installing a new lawn:
· Remove the Old Grass
Using the sod cutter, remove the old grass. This may only be necessary if you are moving into a new home with an existing lawn.
· Prepare the Soil
Level the soil and break up large chunks using the lawn rake. Levelled soil should be about 1 inch below any surrounding paved surfaces to allow room for the new sod. The soil should not be compacted, but loose, allowing roots to penetrate more easily.
· Lay the New Sod
Use a hose to dampen the soil and rake out any footprints or depressions. Unroll your first roll of sod along the longest edge to be covered. Continue laying out the following rolls in a staggered manner, resembling a brick wall. Edges should be snug against each other to avoid gaps but do not let them overlap. If you have a sloped property, lay the sod horizontally against the slope for greater water retention.
· Clean up the Edges
Once you have laid all the rolls, tidy up the edges using a box cutter or sharp knife to give them clean lines.
· Care for Your New Lawn
Water the new lawn twice a day until the roots take securely. This may take up to 6 weeks and fertilizing will help the process. Shady areas should be overseeded.
Expert Insights from Western Turf Farms
Not everyone is comfortable installing their own new lawn and even those who do often benefit from receiving professional insight. Western Turf Farms can offer you expert advice and, if you choose, professional installation services. For more information, contact us today!
